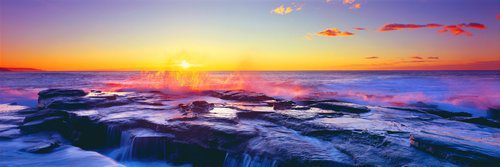
Landscape photography tips
Landscape photography can be incredibly rewarding, but it does come with its own set of challenges. Here are some basic tips and tricks to help you capture stunning landscapes. Australian landscape photography is renowned for its stunning diversity and dramatic beauty. The vast and varied terrain of Australia offers photographers an array of breathtaking scenes, from the rugged Outback to lush rainforests and pristine coastlines. Some key elements and notable aspects of Australian landscape photography include:
Plan your shots
Scout Locations: Research locations beforehand. Use tools like Google Earth, local hiking maps, and photography websites to find interesting spots.
Check the Weather: Good weather can make a huge difference. Use weather apps to monitor conditions and plan your shoots for times when the weather will enhance your scene.
Golden and Blue Hours: Shoot during the golden hour (just after sunrise and just before sunset) for warm, soft light. The blue hour (just before sunrise and just after sunset) offers cooler, softer tones.
Use the Right Gear
Tripod: Essential for stabilising your camera and achieving sharp images, especially in low light.
Wide-Angle Lens: Ideal for capturing expansive landscapes. Lenses in the 14-24mm or 16-35mm range are popular choices.
Filters: Use polarising filters to reduce glare and enhance colours, and graduated ND filters 4,8,16,32 and 64 to balance exposure between bright skies and darker landscapes.
Composition Techniques
Rule of Thirds: Position key elements along the lines or at the intersections of a 3×3 grid to create balanced, engaging photos.
Leading Lines: Use natural lines like rivers, roads, or trails to lead the viewer’s eye through the image.
Foreground Interest: Include elements in the foreground to add depth and dimension to your shot.
Master Your Settings
Aperture: Use a smaller aperture (e.g., f/8 to f/16) for a greater depth of field, ensuring both foreground and background are in focus.
Shutter Speed: For moving elements like water, experiment with longer exposures to create a smooth, silky effect. A tripod is crucial here.
ISO: Keep ISO as low as possible to avoid noise, especially in low light conditions. ( Aim for 50 -100 ISO )
Focus and Depth of Field
Manual Focus: For more control, use manual focus to ensure your point of focus is sharp, especially in low-light or complex scenes.
Hyper focal Distance: Use this technique to maximise depth of field, ensuring that both foreground and background are in focus. Apps and charts can help you calculate the optimal settings.
Post Processing
RAW Files: Shoot in RAW format for more flexibility in post-processing. RAW files retain more data and allow for more extensive adjustments.
Editing Software: Use programs like Adobe Lightroom or Photoshop to enhance colours, adjust exposure, and correct lens distortions.
Avoid Over-Editing: Enhance your image, but avoid over-processing. Aim to retain a natural look that reflects the scene as you saw it.
Experiment and Be patient
Try Different Perspectives: Change your angle, get low to the ground, or find a high vantage point to offer unique views.
Be Patient: Sometimes the best shot comes after waiting for the right light or weather conditions. Stay patient and keep shooting.
Respect Nature
Leave No Trace: Follow the principles of Leave No Trace to minimise your impact on the environment. Stick to trails and avoid disturbing wildlife.
Safety First: Be aware of your surroundings and prioritise safety, especially in remote or challenging locations. By combining these tips with your creative vision, you’ll be well on your way to
capturing beautiful and compelling landscape photographs.


